An Opinionated Introduction to Git
FRIDAY, APRIL 19, 2019 • 11 MINS
Berkeley's CS 61B Data Structures Course is the first time that many students and developers are introduced to version control in the form of Git! In somewhat normalized Berkeley fashion, version control is introduced in a single one hour discussion and not covered too in depth, yet students are expected to have a working understanding of the commitment workflow without necessarily understanding what Git is capable of beyond just a Google Drive for code. A couple months ago, I gave a shot at writing the kind of Git tutorial that I wish I had back then. At the time, version control felt like a very foreign concept relative to my existing domain knowledge in computer science, so I thought that analogies and comparisons to more real life contexts might make some of the ideas more palpable. Feel free to give it a read, and if you have any feedback please let me know in the comments below!!
Basics
Created in 2005, Git is one of the most widely used Version Control Systems to date. To understand version control, imagine you are working on an intensive Java game when all of a sudden, your program crashes. All progress over the past two weeks is lost and you have to start over from the beginning. What a nuisance!
Introducing Git, a Unix based program that serves many powerful purposes, two of which will be heavily explored in CS 61B: 1. Keep track of file revisions and the history of a project. 2. Distribute work on files among multiple people. Git is popular among computer scientists across all levels as a source code management tool. With Git, you can save working copies of coding projects, revert broken code to the latest working version, create different branches of the same code for developing features independently, and collaborate in the form of forks and branches. Don't worry if some of these don't make sense. Once you get the hang of it, learning Git becomes a very organic process.
To understand the true power of Git, another way to define its utility is outside the context of programming. In fact, you can use Git to save changes for anything, from PDFs to JPGs to GIFs. Although this thinking is a bit reductive, for now, you can think of Git as an elaborate, well-documented 'save' function. A Git file is capable of recording any changes for any computer file across any period of time.
Github vs. Git
Github is a service that does web based hosting of your code and allows you to save your git history to a remote server. In contrast, git by itself performs the above operations on a 'local' level, which just means that everything you do happens and stays on your computer. Github is also know as the company that manages the whole process of saving your local git changes to a remote server. Their website serves as an online platform that allows you to view revisions and monitor collaborations. In addition, in case anything happens to your computer, your code will be recoverable and safe as long as you've committed it to Github. It's a fantastic resource.
Resources
- Git Cheat Sheet: https://www.git-tower.com/blog/git-cheat-sheet/
- Git Tutorial (In Depth): https://www.tutorialspoint.com/git/
- Official Git Documentation: https://git-scm.com/documentation
- Student Developer Pack: https://education.github.com/pack
Commands
Here, we're going to review some of the basic commands in git, especially the options associated with adding, removing, and monitoring changes in your files. Don't be worried if by the end of this section, you're still not sure how each command is related or come together. We'll go over that in the next section titled "Workflow". One term we're going to be using multiple times is "option". An option can be thought of as a parameter for a unix command, and they usually come in the form of -(character) or --(word). There are a multitude of options with varying utility, but for now, we'll review the staples. If you're interested in learning about more options out there, you can always type in just the git command itself (i.e. 'git add') and you'll be given a list describing the syntax, parameters, and utility of each option.
An Anecdote
Perhaps the greatest initial barrier to learning Git is understanding what each command is actually doing. Here's a somewhat silly anecdote that, I hope, will serve as a roadmap for comprehending Git going forwards. Imagine an apple farmer. As a farmer, the first thing you'd probably do is pick every apple off of your tree. Then, you'd inspect your harvest, throwing out the bad apples that have mold, insects, etc., while keeping the good ones. Finally, you'd pack the good apples and send them off to the store and turn it into profit.
Git works in a similar fashion. You're the apple farmer. An apple is the equivalent to modifying your project. In other words, every changed file is recorded with a unique signature aka the apple. When you 'git add', you're telling the computer which modifications, or which apples, you want to keep. Finally, with 'git commit', you've packed up the modifications and officially saved a new version of your directory.
Adding / Staging Changes
git add -A
git add (name of change here)
'git add' is the Git command responsible for selecting modifications. When a file is modified, your computer has no idea which modifications are or aren't important. 'git add' is essentially your way of picking out the modifications that you're telling your computer you'd like to keep. A file that has been added is considered 'staged'. To select a change individually, just 'git add (name of modification here)'. Out of the options, you will most likely be using 'git add -A' the most.
| Option | Purpose |
|---|---|
| -A | Stage all recorded changes. Same combination of '.' and '-u' |
| . | Stage new and changed files, but not deleted files |
| -u | Stage changed and deleted files, but not new files |
| -v | Verbose, provides more information about execution |
| -f | Allows you to add ignored files |
| -i | Interactive Mode |
Committing Staged Changes
git commit -m 'Commit Message Here'
It's time to ship the apples. 'git commit' finalizes the staged changes you want to keep and revises the .git file to store a new latest version of the directory. With git commit, you can view previous versions of the directory, compare different commits, and revert back to a previous commit in case something happens to your project.
| Option | Purpose |
|---|---|
| -a/--all | Stage changed and deleted files, but not untracked files |
| -p | Interactive patch allowing you to choose changes to commit |
| -m | Edit commit message, multiple -m's are separated into paragraphs |
Removing or Postponing Changes
git checkout -- (filename)
git rm (filename)
git rm --cached (filename)
git stash save --keep-index
git stash drop
You've encountered a change that you don't want. Time for cleanup. There are two ways to deal with changes that you want. Either delete those changes, or store these changes to be introduced later. Keep in mind, the process of removing files is different for files that have been committed versus those that have not been committed yet. If your file has not been committed, the 'git checkout --
One way to go about deleting a file is 'git rm'. This command removes a file from a working directory. Unlike a regular unix 'rm', 'git rm' not only removes the file, but also stages that deletion. If you only want to delete the file from your .git file, but would like to keep a copy in your local directory, use the '--cached' option. Keep in mind, 'git rm' removes files, not changes. On the other hand, if you're not sure you want to keep the changes you've made, use the 'git stash' command. 'git stash save' allows you to remember the modifications you've made while returning you to the latest commit of your working directory.
Remote Repository Interaction
git remote add origingit remote prune
So far, the above commands have been enacting change on a local level. With 'git remote', we are able to manage Github repositories stored in remote servers. Most remote commands will revolve around getting/setting repository URLs or renaming branches. A sizable set of remote commands also deal with branch management, so we will touch on them in this table, but if you're unclear as to what those are, refer to the collaboration section.
Miscellaneous Commands
| Command | Purpose | Options |
|---|---|---|
| git config | Configuration. Change your username and password, use --global for every repository | |
| git blame | Show who, what, and when something changed in a file | |
| git diff | View changes that have occurred in tracked files | |
| git log | Show history of commits starting with latest commit. | -p (file changes over time) |
| git status | Show the status of different files and changes since the most recent commit | -s (short) |
Workflow
This next setcion is intended to give you a working understanding of how you can use Git and Github with the commands we just introduced. By the end of the this section, you should know how to create local and remote repositories, push changes to both, and remove both.
Creating Repositories
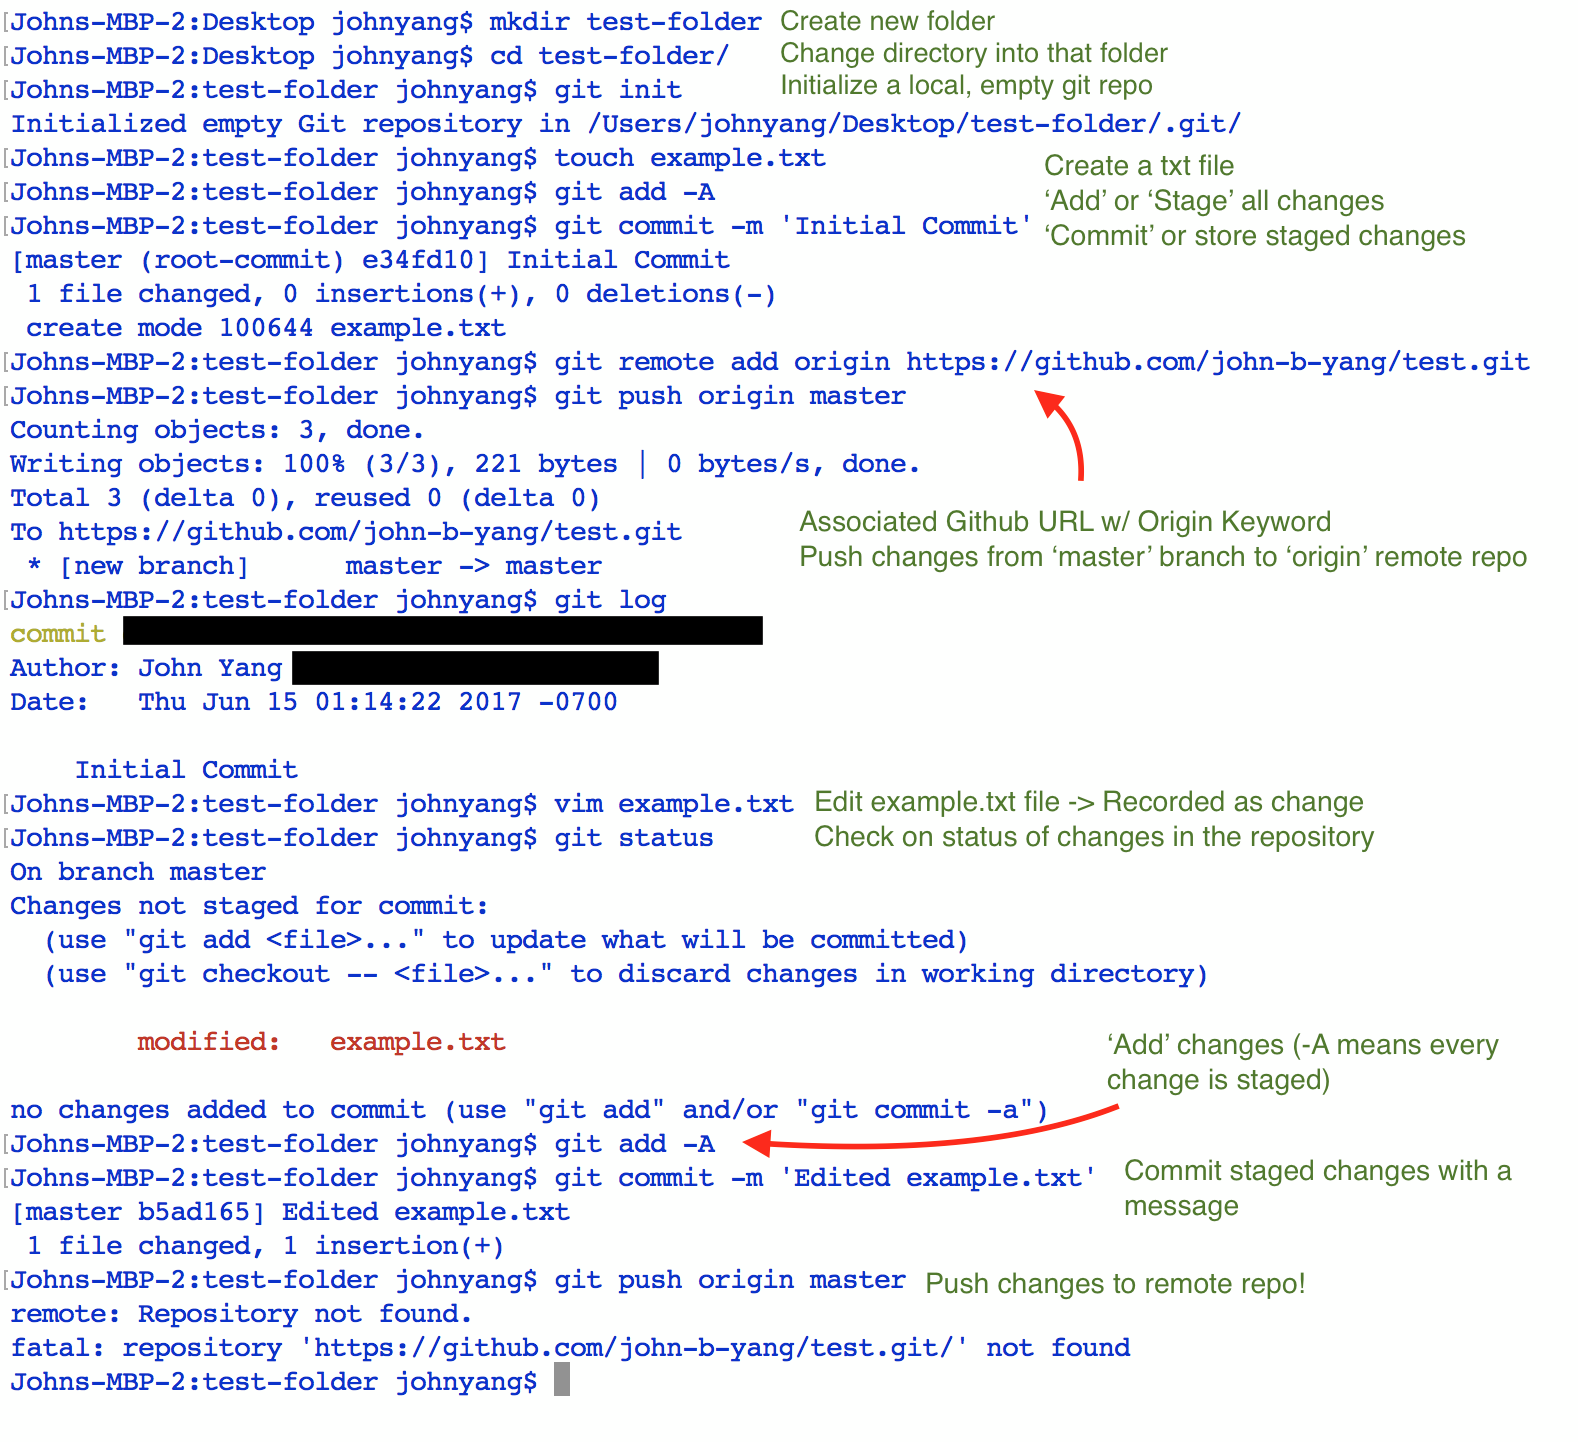
git init
touch test.py
git add -A
git commit -m 'Initial Commit'
git remote add origin https://github.com/(username)/(repository-name).git
git push origin master
This pithy segment of code helps you accomplish many things.
The 'git init' statement creates a new .git file within your current directory. This git file is essentially your local version control file, where local means located on your computer (as opposed to 'the cloud' or some other server such as Google Drive). Keep in mind that the .git file will keep track of modifications to any files and folders within and under the current directory.
'touch test.py' creates a new python file. This is an example of a change that would be recognized by the git file; however, the change would not be staged. In other words, git recognizes that a change has occurred in the directory, but has not recorded it. To officially record changes to the git folder, you need to explicitly tell it to do so.
'git add' stages these modifications. The 'git commit' command officially tells the git file to record these changes. This commit becomes the latest version of the directory. Conceptually, it's a very important step. By itself, your computer has no idea which changes are and aren't important. A commit is essentially your stamp of approval to save the changes that you deem important. Later on, you'll find that it's really useful to look back on previous commits of your project, and in case something lethal happens to your project, you can revert to previous commits.
Up until this point, we've only been using git on a local level. The last two lines involve working with Github, which allows you to send your local files to a remote server stored by Github. Every repository on Github has an associated URL that follows the format above. 'git remote add' associates a keyword, in this case, 'origin', with a destination URL, 'https://github.com/(username)/(repository-name).git'.
Note: You might notice that although you did a 'git init' command, you don't see a new file appear in your directory, and when you do a regular 'ls' command in terminal, you can't find it. This is because git files are hidden files. Don't worry too much about why. Here's a couple ways to 'see' a git, and more generally, hidden files.
- Terminal: 'ls -a' is a regular 'ls' command with the '-a' option that displays hidden files
- Windows : https://support.microsoft.com/en-us/help/14201/windows-show-hidden-files
- Mac: type 'defaults write com.apple.finder AppleShowAllFiles YES' into terminal, then option key + right click Finder and select relaunch.
Recording Changes
git add -A
git commit -m 'Initial Commit'
git push origin master
After you've created a local .git file, this series of commands will dominate your day to day interactions with git. This is essentially the same as the above code segment, except you no longer need to 'git init' because you've already created a .git file, and you don't need to 'git remote add origin' unless the URL of your remote Github repository changed.
Copy an Existing Remote Repository
git clone https://github.com/(username)/(repository-name).git
Let's say while searching Github, you come across a python game project that you find very interesting. Sigh, if you could only download the code and play with it. Thanks to Github's support for an open source community, you can do exactly that! Go to the repository's webpage, copy the github site link, and paste it into terminal with the command above. 'git clone' does exactly what it says it does, it 'clones' a repository.
Something to watch out for. When you clone a repository, it will come with its own .git file. However, unless you're added as a contributor for that repository, you will not be able to commit changes to that repo. If you want to clone a repository and then commit it to Github, you may do so to another repository, which means you must modify the destination URL. Alternatively, Github also allows you to create a 'fork' of the repository, which does the exact same thing as above.
Removing Local/Remote Git Repositories
So maybe a mobile dev. project didn't turn out the way you would've liked it to, and now you want to delete your code. Keep in mind that at this point, your code is essentially saved in two places. To delete your local repository, simply rm -rf the .git file in terminal. To delete your remote repository, go to the settings page and scroll to the bottom 'danger zone' to remove your online repo.
Collaboration
One of the greatest features of Github is the ability to work on projects with your peers. Here, the remote repository is king. One remote repository can be shared among multiple users. However, in order to harness this feature, there is a development process that you must follow. While collaboration is one of Github's best assets, if it's misused, it could also be the reason your project becomes irrecoverable.
General Overview
Before we dive into the commands and nuances, let's start with a more holistic approach, a roadmap of exactly how Github collaboration goes down.
Let's say you and Randy are working on the next hot VR play together. First and foremost, you and Randy create the same repository and add yourselves as collaborators. To get started, you add, commit, and push a couple basic files to the first repository. Let's say your directory contains 'game.cc' and 'character.cc'.
Now, what happens if both you and Randy edit 'game.cc', and attempt to push your commits to the remote repository? In this situation, whoever pushes their commits first will not see any issues. Let's just say you push your commits before Randy. When Randy attempts to push his commits, he will encounter what's called a merge conflict.
The name is pretty self explanatory. When you commit changes to a file, you are, in technical terms, merging the modifications you've made with the previous commit. A merge conflict occurs when there are competing changes that Git does know how to resolve. For example, in this case, if you and Randy both edited the same line(s) in 'game.cc', Git would have no idea which version it should be keeping.
Therefore, keep in mind, in the future, if you and your partner are simultaneously working together on a shared repository (CS61B), make sure to not edit the same lines of a file from the same commit. A good rule of thumb for avoiding merge conflicts is to not work on the same files.
As a last note, there are ways to resolve merge conflicts. In fact in some cases, it's actually a good idea to have Git auto-resolve those conflicts. For example, if you have two conflicting commits on a line in a Python file, you can revert the version you don't want and commit the line that you want to keep. However, files such as simple PDFs or an iOS Storyboard file are visual interpretations of 1000s of lines of byte code and XML. Manually resolving merge conflicts with these files are much more tedious. Abiding by the one-person-one-file rule above will save you a lot of hair-wrenching and time in the future, promise.
Branching Out!
So your game's going pretty well so far. It's a RPG game set in the 1970s with great graphics, and now you're looking for the next feature to add. Suddenly, you've got it! Multiplayer is the way to go! But it's no easy task, and to be honest, you're not quite sure it'll come out the way you want to. Do you want to attempt creating the multiplayer feature at the risk of breaking the code in your git repository?
Luckily, Git doesn't force you to choose one or the other. Introducing git branch. 'git branch' allows you to create different copies of your project from the same commit. Here's a visualization to help:
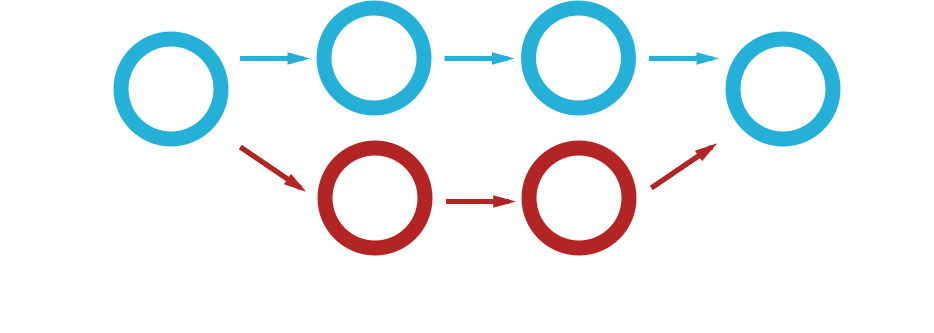
Branches are simply pointers to commits. As a convention, the 'master' branch tends to be a pointer to the working version of a project. By the example, the 'master' branch would most likely hold the latest working copy of your game while the 'feature' branch would point to the multiplayer project. When you merge a branch with another, just like before, it's important to make sure there are no conflicts.
Commands
Creating / Switching Branches
Let's start from the basics: creating and switching from branch to branch! Every repository has at least one branch, commonly called the master branch. When you create another branch, you're photo-copying your project at its latest commit. Local branches have a corresponding remote branch that exists on Github. With branches, your 'push' command will look a bit different. Instead of 'git push origin master', you'd replace 'origin' and 'master' with your remote and local branch names in that order.
| Commands + Options | Purpose |
|---|---|
| git branch | View list of all branches |
| git branch (name) | Create a new branch with 'name' |
| git branch -d (name) | Delete a branch with 'name' |
| git branch -r | List remote branches |
| git branch -a | List local + remote branches |
| git checkout (name) | Switch onto existing branch named 'name' |
Retrieve Updates from Remote Repository
Continuing with Randy, let's say Randy pushed a couple changes to the remote repository. Now, before you keep working, it's important that you retrieve Randy's changes so that your local directory reflects those changes. This is where the 'pull' and 'fetch' commands prove helpful. These commands take unseen remote repository changes and update your local repository.
Keep in mind, however, that this command is where merge conflicts most often appear. If the same file is modified both locally and remotely, git pull is what exposes the conflict. Some best practices are to make sure to 'git stash' conflicting changes before pulling.
| Commands + Options | Purpose |
|---|---|
| git pull (remote) (branch) | Applies 'remote' modifications to local 'branch' |
| git fetch (remote) | Retrieves changes from 'remote', does not apply them locally |
| git merge (branch) | Combines two branches by creating a new commit or fast forwarding |
The Grand Finale!!
Whew, that was a lot! Great job getting through all that material! At the end of the day, all of the above boils down to the below!