
Build a Twitter Bot!
SUNDAY. NOVEMBER 11, 2017 • 11 MINS
Today, around 15% of Twitter, or 48 million accounts, are bots (CNBC)! From more helpful bots like @earthquakeSF to the more notorious use of propaganda machines in the recent U.S. election, bots have taken on new roles influencing society on cultural, economic and political levels. This tutorial teaches you how to create a full scale Twitter Bot. We'll go through how to generate original sentences, post tweets to a public account, and automate the entire process!
Step 1: Selecting + Cleaning a Corpus
The initial step to creating a successful Twitter Bot depends on finding a repository of words that your bot can emulate. The primary features of this text emphasize consistency and word count. A large amount of text increases the grammatical and contextual patterns that the bot can identify and emulate. To put it simply, the lengthier the book, the richer the sentences. From experimenting with different texts, I'd recommend at least a document of at least ten thousands words.
For a basic bot, any lengthy novel should suffice. A good place to start would be classical literature. These texts satisfy that 10000 word threshold, but are not so long that text processing takes an inordinate amount of time. In addition, these books are consistently rich in style, so the sentences your chatbot generates will have its own unique and quirky dialect. Usually, you can find online copies of these books in the form of web pages and PDFs. For our purposes, it's better if you find a web page, as it makes the process of reading and parsing the text relatively easier compared to a PDF source. Project Gutenberg and many universities' online libraries are excellent places to look.
When you've found a book you like, look into the Diffbot API for parsing and cleaning up the text. It's a fantastic web crawling API that allows you to download and filter a website's source code. The generate_corpus.py file in my Github repository details how I performed text extraction and clean up. Make sure to remove superfluous HTML tags and unknown characters. It's also important to take into account the context of your text. Ask yourself whether certain characters should actually be removed. For example, while it's reasonable to eliminate "<" or ">" characters if they are part of html tags, given a different context such as a math textbook, the two could be serving as comparison operators. In this situation, you wouldn't want to remove "<" or ">" from your body of text. After cleaning the text, store the resulting body inside a text file.
Files: book_sample.txt, generate_corpus.py
Step 2: Corpus Tokenization & Creating the Markov Chain
After Step 1, you've successfully read the source code of the website containing your desired text, cleaned your text of superfluous HTML text and unknown characters, and stored the output into a text file. Now, the next task involves converting this book into a navigable, random, and representative data structure that can be used to generate grammatically sound sentences that emulate our text. Introducing, Markov Chains.
The Markov Chain is a structure that falls under the domain of discrete math and probability. There is a plethora of mathematics and applications that I highly recommend diving into (Google's PageRank algorithm, the backbone of Search, is a Markov Process!). However, for the sake of this tutorial, we'll use Markov Chains primarily for how it can make future predictions of a state based on its present state. To illustrate this concept, let's say we're given a sentence "I eat fast, you eat slow, I eat fast, I eat slow". A Markov Chain can be thought of as a graph-like snapshot of the structure of this sentence, where each node is a word 'A', and each edge is a probability reflecting the likelihood of a word 'B', following word 'A'.
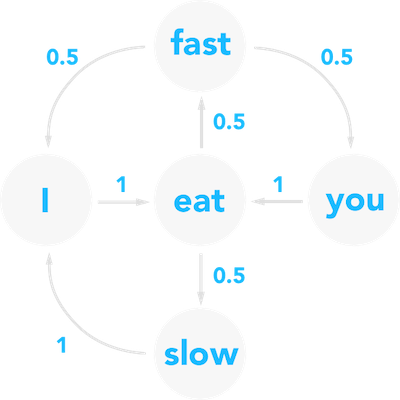
In the original sentence, the word 'I' appears three times, and it is followed by the word 'eat' all three times. Therefore, there is a probability of 3/3 or 1 that any random traversal of the map involving 'I' will be followed by 'eat'. On the other hand, 'fast' appears two times, followed by 'you' and 'I' respectively. Therefore, there is a 1/2 probability that a random traversal from 'fast' results in 'I', and a 1/2 probability it results in 'you'. In this step of the program, we will be applying the same logic from above to map an entire book. In Step 3, we will generate a random sentence by performing a traversal on the resulting Markov Chain representation of the book.
Let's think about the best data structure for representing a Markov Chain. We want a construct that will be able to store nodes and edges. We also need to preserve relationships between nodes and edges in the format of a one to many association. In this case, a Map / Dictionary would best suite our purposes. Given that each node can have multiple edges, we define the key to be the node, and the value to be a list of edges. We could create Node and Edge classes. However, to reduce the map's complexity, we can define a Node as just the word and the Edge as a list of tuples, where each pair is the subsequent word and the probability it shows up. The above graph would be encoded as such:
[
    {"I": [{"eat" : 1}]},
    {"eat": [{"fast" : 0.5}, {"slow" : 0.5}]},
    {"you": [{"eat" : 1}]},
    {"fast": [{"I" : 0.5}, {"you" : 0.5}]},
    {"slow": [{"I" : 1}]}
]
Looking at the graph and table above, you might be asking yourself an important question: Where does a random traversal of the Markov Chain start? And equally important, where does it end? Later, when we generate sentences, identifying start points and end points is critical to making sure our Markov Chain traversals produce grammatically sound sentences. Let's think about the characteristics of the first word in a sentence. Part of speech (i.e. noun, adverb, preposition, etc.) doesn't quite narrow it down, since there are plenty of types of words the sentence could begin with. The first word is always capitalized, but so are proper nouns. Perhaps the most distinguishable characteristic is that the first word in a sentence always follows some form of terminating punctuation (!?.). Similarly, the last word would precede such punctuation. Therefore, while building the Markov Chain, it'd be wise to identify and store all "start" and "end" values based on the criteria above. This data will come in handy in the next step.
Before I end this section, I'll introduce one more optional concept, the 'N-gram Markov Chain'. This section is not necessary to building an MVP version of your Twitter Bot, but it drastically improves the quality of generated sentences. The above Markov Chain features nodes with just one word. What if, instead of one word, each node was two words? This is called a 2nd Order Markov Chain. In the first Markov Chain, the transition probability is defined by only one state. When we introduce two words, the Markov Chain identifies relationships between phrases. It follows that by increasing the length of a node, we introduce more grammatical and stylistic context that results in better sentences. And there's no reason we need to stop at 2 words. An N-gram Order Markov Chain is when each node features 'n' words. Keep in mind that while your sentences do become more rich and grammatically correct, there is a significant tradeoff in extra time and space required to store and identify larger phrases for each node.
I'll leave it up to you to implement the Markov Chain construction. The general idea is to iterate through the text, register every word as a key, and record the number of appearances for words that follow it. If you're getting stuck, reference the make_sentence.py file for help.
Files: tokenize.py, make_sentence.py
Step 3: Generate a Sentence
You've finished Step 2. Congratulations! You're done with the brunt of the program. At this point, you should be able to generate and store your own representation of a Markov Chain somewhere in your code. In addition, you've identified "start" words in your Markov Chain, words you can being your sentences with. Now, it's time to perform a random walk of your code and generate a sentence!
I approached this problem in an inductive manner where I identified the starting values, end condition, and iterative step. So where do we start? With a "start" word! This is the list you generated in Step 2 which stores words following terminating punctuation. Randomly choose any word from that list. We have our start point. Now, we need to identify where our sentence should terminate. A sentence terminates with terminating punctuation. Therefore, when we generate our sentence iteratively, let's establish a base case where we stop when the next node we visit is a terminating punctuation mark. So what actually goes inside the loop? The basic inductive principle is that we want to use our current sentence to probabilistically determine which node to append to it next. We begin with the value of a singular node. We identify the node in our Markov Chain. Randomly, we select a subsequent node and append the associated word / phrase to our current sentence. We repeat this node traversal until we visit hit the terminating punctuation condition.
Exactly how to translate the previous paragraph into code is a bit daunting. To help, I'll explain my own implementation of the above idea, and hopefully it'll clarify some statements while providing some inspiration for what you might do.
def generateSentence(markov_gram_length):
    curr = random.choice(starts) # Choose starting point
    sent = curr.capitalize() # Sentence to return
    prevList = [curr] # List of previous nodes
    while (curr not in "."):
        curr = nextWord(prevList)
        prevList.append(curr)
        if (len(prevList) > markov_gram_length):
            prevList.pop(0)
        if (curr not in ".,!?;"):
            sent += " " # Spaces between words, not between punctuation
        sent += curr
    return sent
This method takes in an int parameter 'markov_gram_length' and returns the generated sentence. The first three lines of the method chooses the starting word, capitalizes the starting word, and adds it to a list. You can think of the list as the storage of previous nodes. The iterative loop ends when the node is a terminating punctuation mark. The 'nextWord' method uses the aforementioned list to determine the next node to visit. The resulting next node's value is added to both the list and the return value 'sent'.
For help, reference the make_sentence.py file, specifically the "generateSentence" method. Keep in mind, my methodology may not translate well to your code, especially if you framed your Markov Chain using a data structure that's different from mine. I encouraged to use it as a launching board for how you might approach your own traversal. At the end of step, you should be able to perform a traversal of your Markov Chain from Step 2 that generates a grammatically correct sentence. Your main product is complete! In the next steps, you will deploy and push your code to the world!
Files: make_sentence.py
Step 4: Twitter API
By this step, your actual bot is complete! You have a fully functioning Python program that first, can generate a text file of a book from a webpage. It then converts the book into a Markov Chain, and your program can perform a random walk of the model that generates a grammatically sound sentence. In these next three sections, we'll be adding the "Twitter" component to your Twitter Bot. In this step, we'll create a Python module that takes a string value and posts it to a Twitter account hosting our bot. Later, we will pass in our original sentences from Step 3 as a parameter into this Python module to post them for the world to see!
Before we even think about posting, we have to establish a connection between the module and the Twitter account. To do so, we'll be create a OAuth1Session with our Twitter account. OAuth is simply a protocol that authenticates our application with Twitter's API. There are four different kinds of keys required to establish a session. After you create a Twitter Account, you can find / generate all four keys by visiting the apps link. Once we've created the session, to post tweets, we can make a POST call that takes 2 parameters: 1. A URL denoting the "tweet" operation and 2. A JSON containing the sentence we want to "tweet". The primary code snippets are presented here (visit the twitter.py file for the full detail):
# Create Authentication Session w/ 4 Keys.
# I recommend keeping the values for these keys in a hidden file (refer to last paragraph of this step)
session = OAuth1Session(consumer_key, client_secret=consumer_secret,
        resource_owner_key=access_token, resource_owner_secret=access_token_secret)

# Tweet method takes a String value and returns the POST request's response code
def tweet(status):
    # URL Endpoint to update status
    url = "https://api.twitter.com/1.1/statuses/update.json"
    # POST request to url with 'status' parameter
    resp = session.post(url, {'status': status})
    # Show text from response to POST request. Unsuccessful requests will generate error codes
    return resp.text
Twitter has excellent documentation on how to use their API, and by exploring it more in depth, you can probably come up with much more impressive use cases. Try making your Twitter bot responsive! If someone interacts with your bot, whether in the form of a tweet, like, or share, how can you configure your bot to respond accordingly? For this particular project, I focused exclusively on the post request. Note that the 140 character limit is enforced, so posts that exceed the limit may incur an error code during the requests call.
Quick Note, I do recommend storing the keys within a hidden file as opposed to copy and pasting them directly into your code, especially if you plan on open sourcing the code in the future. To protect your private account keys, store the in a hidden file, then set them as environment variables. Look into the python-dotenv library for reading values from hidden files. The dot-env module will allow you to reference the key values stored in your hidden file as environment variables in your code, effectively setting up a layer protection that prevents other people from appropriating your Twitter account's keys if you happen to put the code on Github. Make sure to list hidden files in your gitignore.
Files: twitter.py
Step 5: Flask Development
Congrats! By this point, you have an actual Twitter Bot! Now, people all over the world can see your Twitter Bot tweet! In addition to just viewing the tweets, wouldn't it be cool if people could generate and post tweets to your bot? If we deploy our Twitter Bot's functionality onto a website, we can create an extra platform that people can interact with. In this step, we'll be using Flask, a lightweight Python based backend, to create a web app that allows anyone to generate and post tweets to your Twitter Bot's account.
Flask is a wonderfully simple microframework for web development. If you're like me and not very well versed in web development, I'd definitely recommend Flask for its simplicity and straightforward customizability. It's very easy to set up and intuitive to use, great for building and understanding web application projects. I've used Flask to build both this Twitter Bot web app and this very website, too! In this particular project, we'll be using Flask to render a HTML file that presents a generated sentence and a "post" button that, when clicked, posts the sentence to the Twitter account. Make sure to use
Here's the main code we'll be looking at (from server.py):
from flask import Flask, render_template, request, redirect
import make_sentence, os, twitter
app = Flask(__name__)

@app.route('/')
def hello_world():
    return render_template('index.html', sentence=make_sentence.run())

@app.route('/tweet', methods=['POST'])
def tweet():
    status = request.form['sentence']
    twitter.tweet(status)
    # Returns 400 Bad Request if tweet is longer than 140 characters
    return redirect('/')

if __name__ == '__main__':
    port = int(os.environ.get('PORT', 5000))
    app.run(host='0.0.0.0', port=port)
Starting up Flask is as simple as passing in your module's name in the form of the 'name' variable. Each of the methods are preceded by what are called 'route decorators'. Each decorator tells your Flask application what kinds of URL's should trigger what kinds of actions.
The first route decorator with '/' tells the application to execute the "hello_world" method when the base URL is visited. Using the 'render_template' command, we load the index.html file and generate a tweet that is displayed on the webpage. You might be a little surprised that the index.html file doesn't contain typical looking HTML code. That's because Flask uses the Jinja2 template engine to perform webpage rendering. I'm not going to go into Jinja2 too much because it's not terribly important in the context of this project, but if you continue to pursue Flask driven web development, I highly encourage studying it more to create beautiful and responsive front pages.
The '/tweet' route tells the website to execute the Python module (from Step 4) which posts the generated sentence to your Twitter Account. After finishing the tweet, the return statement redirects the web page to the '/' route decorator which re-renders the homepage.
The last conditional code block can help you test whether your application is whether working. When you run this Python file, Flask will host your web page locally, on your computer. Open the application on any browser to do some debugging and testing before deployment. For reference, this is what my webpage looks like.
Files: server.py
Step 6: Heroku Deployment
So your website's working. Great! But no one can see it because it's hosted locally on your computer. Time to ship your code and deploy it. We'll use Heroku, a popular PaaS service, to host the code behind our web app from Step 5.
So what is Heroku? It's a web application deployment model that supports a plethora of languages, including Python. Through Heroku, you can engage in the building, running, and scaling of your app. Heroku has a fantastic tutorial about deploying Python and Flask apps. If your web app is working locally, following these steps should get your app up and running. I'll take this section to explain the new files that you'll need in addition to some issues I ran into while deploying.
The procfile is a file that specifies how to run the web application. Typically, it's a bash command that starts up the web app. In our case, it's simply the command you'd type in to run your Flask webpage from Step 5, which looks like 'python [name of Step 5 file].py'. The requirements.txt file is pretty self explanatory. Heroku looks for this file to register the dependencies and libraries needed to run your web application. Make sure to specify both the name of the dependency and the correct version. You can type 'pip list' in terminal to see which dependencies + versions have been installed. Last but not least, you'll also need a runtime.txt file. This is a simple, one line text file specifying what version of Python your web app uses to run.
There are some things to watch out for. Make sure the libraries and, more importantly, their versions that you specified in requirements.txt are compatible with the Python runtime version you specified in runtime.txt. I ran into error where I submitted a runtime file with version 2.7, yet the versions for the python-dotenv library was too high. Also, remember the conditional block in Step 5?
if __name__ == '__main__':
    port = int(os.environ.get('PORT', 5000))
    app.run(host='0.0.0.0', port=port)
Remember to specify the 'host' parameter in the second line to be '0.0.0.0' as shown. If you don't include it, when Heroku attempts to deploy your app, it will by default attempt to bind to your localhost (127.0.0.1) address. In other words, the app will not bind to a externally visible interface. This stack overflow question details the error.
Files: procfile, requirements.txt, runtime.txt
Step 7: Scripting
All right, your bot is decked out. You have something that can be viewed by anyone in the world! But let's be realistic, unless you're planning to integrate this Twitter bot into a business or service platform, chances are, there's not going to be many people who can Google or Twitter search their way to your website and Twitter account. A couple month later, you pull up the bot to show off your friends, and that's when you notice the last time you tweeted was seven weeks ago. An inactive Twitter bot is as good as a dead Twitter bot. In this section, we'll breath some life into our bot by writing a script that we'll automate to run automatically after a certain amount of time. Your Twitter bot will become a self-operational, autonomous tweeter.
First and foremost, we want to create a Python module that generates and tweets a sentence in one stroke. This is a pretty straightforward task, where we just mix, order, and daisy chain the modules we wrote in previous steps. I designed my previous modules in such a way that I directly feed the output of the 'make_sentence' method into the 'tweet' function. It's a very simple program, but it combines all the gears to pack a powerful punch of execution. For reference, the function is located in the tweetjob.py file.
import make_sentence, twitter, datetime

if __name__ == '__main__':
    print(datetime.date.today())
    twitter.tweet(make_sentence.run())
    print("Completed Successfully")
We have the functionality, but how do we automate it? We'll use a bit of shell programming magic to make it happen! First, you're going to write a dirt simple shell script. Create a file with the extension '.sh'. Then, put the following segment of code inside. Make sure to include the absolute path to your Python module. Here's mine as an example. You only need the second line, and you can ignore the >> for now.
python /(Absolute path to your automated tweet file)/tweetjob.py
When you run this shell file (put a './' in front of the filename), it'll execute the automated tweet file, just like it would on terminal. What makes this shell program special is when we register it as a cronjob on our local computer! Cron is a time-based job scheduler that's available in all Unix based computer operating systems. A cronjob is a process or set of commands that we can create and configure to run periodically. All cronjobs are stored within a 'crontab' file. By editing the crontab, we can specify which shell scripts we want to run and often we want to execute them. You can edit the crontab by typing 'crontab -e', and it sends you to a vim editor screen where you'll want to enter the following line:
0 12 * * * bash /(Absolute path to your shell script)/tweetscript.sh
Let's break this line down. The first five characters, " 0 12 * * * ", specify the frequency with which you want to run the cronjob. The time is specified as min (0-59), hour (0-23), day of month (1-31), month (1-12), and day of week (0-6), respectively. Note that the hour is in Zulu time and day of the week starts with Sunday as 0. In this case above, you would be running the job everyday at 12 p.m. The time is followed by the command you want to run. In this case, we use the 'bash' command to execute the shell script we just wrote. In conclusion, at 12 p.m. everyday, as long as your computer is on, a new tweet will appear under your account!
Files: tweetjob.py, tweetscript.sh
Congrats! You made it to the end of the tutorial! I hope it was helpful, and maybe a bit fun! If you have any feedback, I'd love to hear from you! I just released this article, so if you notice anything off, wrong, or in need of clarification, please feel more than free to lay it down for me! Thanks so much for reading!
Links
- Captain Nemo Twitter Bot
- Twitter Bot Source Code
- Tweet Generator Web Page (This page takes a while to load b/c Heroku)