Automated CoreML Conversion V1.0
monday. january 29, 2018 • 9 mins
In recent years, the advent of machine learning has produced ripple effects felt across the software development process. Individuals and corporations have whipped up absolutely fantastic, futuristic concepts into reality with the help of machine learning tools, from autonomous drones, to a flawless Mario, to the most elite Go player in human history!
However, while machine learning has become a familiar term, the technical strata that defines the mathematics behind it is relatively less accessible. As machine learning gains social momentum, one of the more important initiatives may become making it more comprehensible and available. Recently, Google released their AutoML product on Google Cloud Platform, allowing developers to intuitively construct and deploy their own machine learning infrastructure.
At Apple's 2017 World Wide Developer's Conference, one of many newly unveiled developer tools included CoreML, Apple's own integration framework allowing developers to create, train, and run customized machine learning on iOS applications. With localized ML models, apps can produce results faster, eliminating latency issues often associated with server side ML infrastructure. All it requires is creating your own customized MLModel file, then placing it into your application.
However, due to this technology being relatively new, there are two inconveniences that have presented themselves: 1. There aren't that many .mlmodel files out there for use aside from some popular computer vision algorithms that can be found on Apple's website. 2. The documentation and code examples for CoreML conversion and potential errors is not as populated as one might hope so. With the theme of ease of use in mind, I recently pursued an initiative that I hope will make CoreML machine learning in iOS development a much easier process. The project code is on Github, linked here.
A Brief Primer on CoreML Conversion
Before diving into the technicalities of the application itself, I thought it'd be worthwhile to quickly explain exactly how creating a custom CoreML model works from a developer's standpoint. Keep in mind, in this article I'm discussing how to create a CoreML file from a Python script, not how to use one in an iOS application. Currently, Apple has a single page of official documentation here that teaches you how to take ML models created with 3rd party libraries and refactor them into the ML Model format. There's a wide variety of available models, from Neural Networks to Support Vector Machines to Pipeline Models. All custom ML models must be written in Python using one of the following libraries: Scikit-learn 0.18, XGBoost 0.6, Caffe v1, Keras 1.2.2+, or LIBSVM 3.22.
Creating an MLModel file isn't all that difficult. In fact, it's a pretty redundant process. First, you'll import the corresponding libraries for the models that you're looking to convert. Then, you'll take whatever data set you're using for predictions and train the model around it. Finally, once you've trained the model, Apple's coremltools python package provides a simple 'convert' function that takes in your trained Python model as a parameter and spits out an '.mlmodel' file. In code, it's as simple as running the following code. In this example, I'll be using the acclaimed Titanic data set and a Random Forest Classifier to predict which passengers survived the icy debacle (full disclosure, this model's performance is terrible and is only intended for demonstration purposes).
# Importing Sklearn, Pandas, and Numpy Libraries
import sklearn
from sklearn.ensemble import RandomForestClassifier
from sklearn.metrics import classification_report
from sklearn.model_selection import train_test_split

import pandas as pd
import numpy as np

# Reading Titanic Data into Pandas Dataframe
data_file = 'titanic_data.csv'
raw_data = open(data_file, 'r')
data_frame = pd.read_csv(data_file, index_col=0) # Removing index column

# Separating data into training and testing sets
y_data = data_frame[["Survived"]]
x_data = data_frame.drop(axis=1, labels=["Survived"])
X_train, X_test, Y_train, Y_test = train_test_split(x_data, y_data, train_size=split_ratio, random_state=0)

# Creating model, performing classification, and calculating performance accuracy
model = RandomForestClassifier()
model.fit(X_train, Y_train)
Y_prediction = model.predict(Y_test)
print(classification_report(Y_test, Y_prediction))

# Converting to MLModel file
coreml_model = coremltools.converters.sklearn.convert(model, ["Pclass", "Age", "Fare"], 'survived')
coreml_model.save('TitanicSurvival.mlmodel')
Voila! Your machine learning model is now ready to be integrated and used in your iOS application. I won't be diving too much into what that process looks like, but if you're curious, Apple's official CoreML documentation gives you step by step instructions on how to get your ML model file up and running.
Before CoreML, performing machine learning on iOS went in one of two directions. You could either reimplement it entirely in Swift and Objective-C, or you could host the model for a more server side approach. Reimplementation is a tedious undertaking because of the lack of flexibility that iOS development languages have in the math and logic departments, especially when compared to a language like Python with a myriad of tailored ML and calculation libraries. A traditional server side approach allows for more flexibility in your model, but it comes at a tradeoff. Latency and reliability will perpetually be an issue. In addition, maintaining a server could be an expensive and unscalable solution that becomes a greater headache as an app gains users (which should be a good thing)!
CoreML represents the best of both worlds. As a localized file that sits within your app, it eliminates the latency and scalability qualms of server side solutions, allowing you to front load any ML work onto your users' devices as opposed to your own. In addition, the ability to convert models preserves the flexibility that comes with Python written code. In addition, an MLModel is optimized for fast performance by the iOS architecture itself. Hopefully, I've convinced you somewhat of how much of a game changer CoreML is.
Automating CoreML's Solution
As we can see from above, the actual code that goes into creating a customized CoreML file isn't all that hard. What's interesting to note is that this same structure of code will persist pretty much across the board. Whether it's a regression or classification problem, different models can be fed through essentially the same structure of code without any drastic changes. For example, if I were to create a Random Forest Classifier as opposed to a Support Vector Machine, the only change that's required is instead of model = RandomForestClassifier(), we would import the SVM library (i.e. from sklearn.svm import SVC()) and use model = SVC() instead.
This singular observation is the foundation of my idea for automated CoreML conversion. Instead of forcing developers to rewrite this same set of redundant code, what if we could add a platform on top of this Python script that could change the model being trained with just a click of the button? This is where the "automated" aspect of CoreML conversion comes in. With this idea in mind, it's easy to see how making that one line of code dynamic can make this script a recyclable method for generating different machine learning models with all sorts of test sets.
My implementation is as follows:
# Basics
import sys
import numpy as np
import pandas as pd

# Sklearn Models
import sklearn
from sklearn.naive_bayes import MultinomialNB
from sklearn.svm import LinearSVC, SVC
from sklearn.ensemble import RandomForestClassifier, GradientBoostingClassifier
from sklearn.neighbors import KNeighborsClassifier
from sklearn.tree import DecisionTreeClassifier

# Sklearn Metrics
from sklearn.model_selection import train_test_split
from sklearn.metrics import classification_report, confusion_matrix
from sklearn.pipeline import Pipeline

def conversion(data_file, split_ratio, user_models, y_data_column):

    raw_data = open(data_file, 'r')
    data_frame = pd.read_csv(data_file, index_col=0) # Removing index column
    y_data = data_frame[[y_data_column]]
    x_data = data_frame.drop(axis=1, labels=[y_data_column])

    X_train, X_test, Y_train, Y_test = train_test_split(x_data, y_data, train_size=split_ratio, random_state=0)

    requested_models = user_models.split()
    requested_models = [x.lower() for x in requested_models]

    available_models = ["svc", "knn", "decision-trees", "random-forest", "gradient-boosted"]

    svc = Pipeline([('clf', SVC())])
    knn = Pipeline([('clf', KNeighborsClassifier(n_neighbors=3))])
    decision_trees = Pipeline([('clf', DecisionTreeClassifier())])
    random_forest = Pipeline([('clf', RandomForestClassifier())])
    gradient_boosted = Pipeline([('clf', GradientBoostingClassifier())])

    available_pipelines = [svc, knn, decision_trees, random_forest, gradient_boosted]

    requested_pipelines = []
    requested_models_filtered = []
    for model in requested_models:
        model = model.strip('"')
        membership = str(model) in available_models
        if membership:
            requested_models_filtered.append(model)
            requested_pipelines.append(available_pipelines[available_models.index(model)])

    output_text_file = open('output.txt', 'w')
    return_value = ""
    count = 0
    for index in range(len(requested_pipelines)):
        pipeline = requested_pipelines[index]

        pipeline.fit(X_train, Y_train)
        Y_predict = pipeline.predict(X_test)

        report = classification_report(Y_test, Y_predict)
        matrix = confusion_matrix(Y_test, Y_predict)

        return_value += str("Model: %s\n" % requested_models_filtered[index])
        return_value += str("Classification Report: \n%s\n" % report)
        return_value += str("Confusion Matrix: \n%s\n\n\n" % matrix)

        count = count + 1

    output_text_file.write(return_value)
    output_text_file.close()
    return return_value
Let's walk through it. Before the function declaration, I've imported multiple classification models from the SKLearn library. I've also included the "classification_report" and "confusion_matrix" tools that will help quantitatively evaluate each model. The conversion function itself takes in a user data file, a split ratio, a list of models requested by the user, and the name of the y-data column. The user data file is expected to contain both the labels and their corresponding vector data. First, the user data file is opened and placed into a data frame. Then, using the y-data column name identified by the user, the data set is separated into the 'x_data' and 'y_data' portions. Using the 'train_test_split' method, the X and Y data is then split into training and testing data sets.
Next, we figure out which models the user requested to be tested. Based on the import statements, we currently have five available models (SVC, Random Forest, Gradient Boosted, KNN, Decision Trees). The user's requested models are checked to see if they are available. The requested_models_filtered reflects those models that are requested and available. Now for the fun part. As opposed to using a single model, we utilize the Pipeline sklearn class along with a simple for loop to run through each requested model, fit the training data, and generate a classification report based on the alignment between the predictions and actual Y_test data. The function returns a string containing the classification reports and confusion matrices for each tested model.
So how did I do? Objectively speaking, maybe a 5/10. This script definitely introduces the concept of flexibility, allowing users to enter 'n' data sets and models without having to create 'n' different python scripts for each model. However, it's a very constrained sense of flexibility, aka there is a good amount of hard coding. So what are the challenges / potential improvements for this script? First and foremost, a truly flexible model would not have a list of 'available models' that the user is limited too. Theoretically, it'd be very nice if the user could type in any model in the world and have it run through the script. However, the obstacle that I ran into was this concept of importing the correct corresponding library for models on the fly. For example, let's say the user wanted a convolutional neural network to perform image classification. How can I locate and import the correct CNN library from Caffe or Keras without a hard coded import statement?
Second, there's not that much model customizability. For instance, the KNN model that I've included above is hard wired with a neighbors value of 3 (n_neighbors = 3). It'd be pretty fantastic if the script could reflect the exact specifications of their model. Right now, the user would only be getting a very bland K-Neighbors Classifier . What'd be cooler would be if a user could request and receive a KNN that considers the 6 nearest neighbors using a KDTree search approach with a leaf size of 50. It's nice in theory, but difficult in implementation. Each machine learning model has a very disparate set of parameters. Yes, I could hard code the fields associated with each model, but for true flexibility, that's not the route to pursue. So once again, the question boils down to how to design a more dynamic framework.
In summary, I'm pretty proud of the framework above. It's a functional and sensible prototype that satisfies the "automated" aspect of CoreML conversion. However, there are definitely improvements to be made, and the eventual goal is for the conversion script to be largely free of hard coded imports. Instead, I hope to create a flexible function that allows the code to find, import, and define the correct user models during execution. I'm really hoping to revisit this segment of this project as I continue to work on it. However, for now, the above program works. At the time, I wanted to build out the minimum viable product, so I just rolled with it. Time to build a platform around the script!
Decorations: An Accessible Platform
This script by itself is not entirely accessible. I could've put it on Github with a tutorial, but when an opportunity like this arises, why not slap on a web platform? Again, the goal of this project is to introduce ease of use in the CoreML conversion process. Therefore, it'd make sense to abstract some aspects of the script that might not be intuitive. To be upfront, there's nothing brilliant or original about creating the website. The intention of this section is less about teaching and more about explaining the reasonings behind what aspects of CoreML conversion should be user defined. This is a screenshot of the main page:
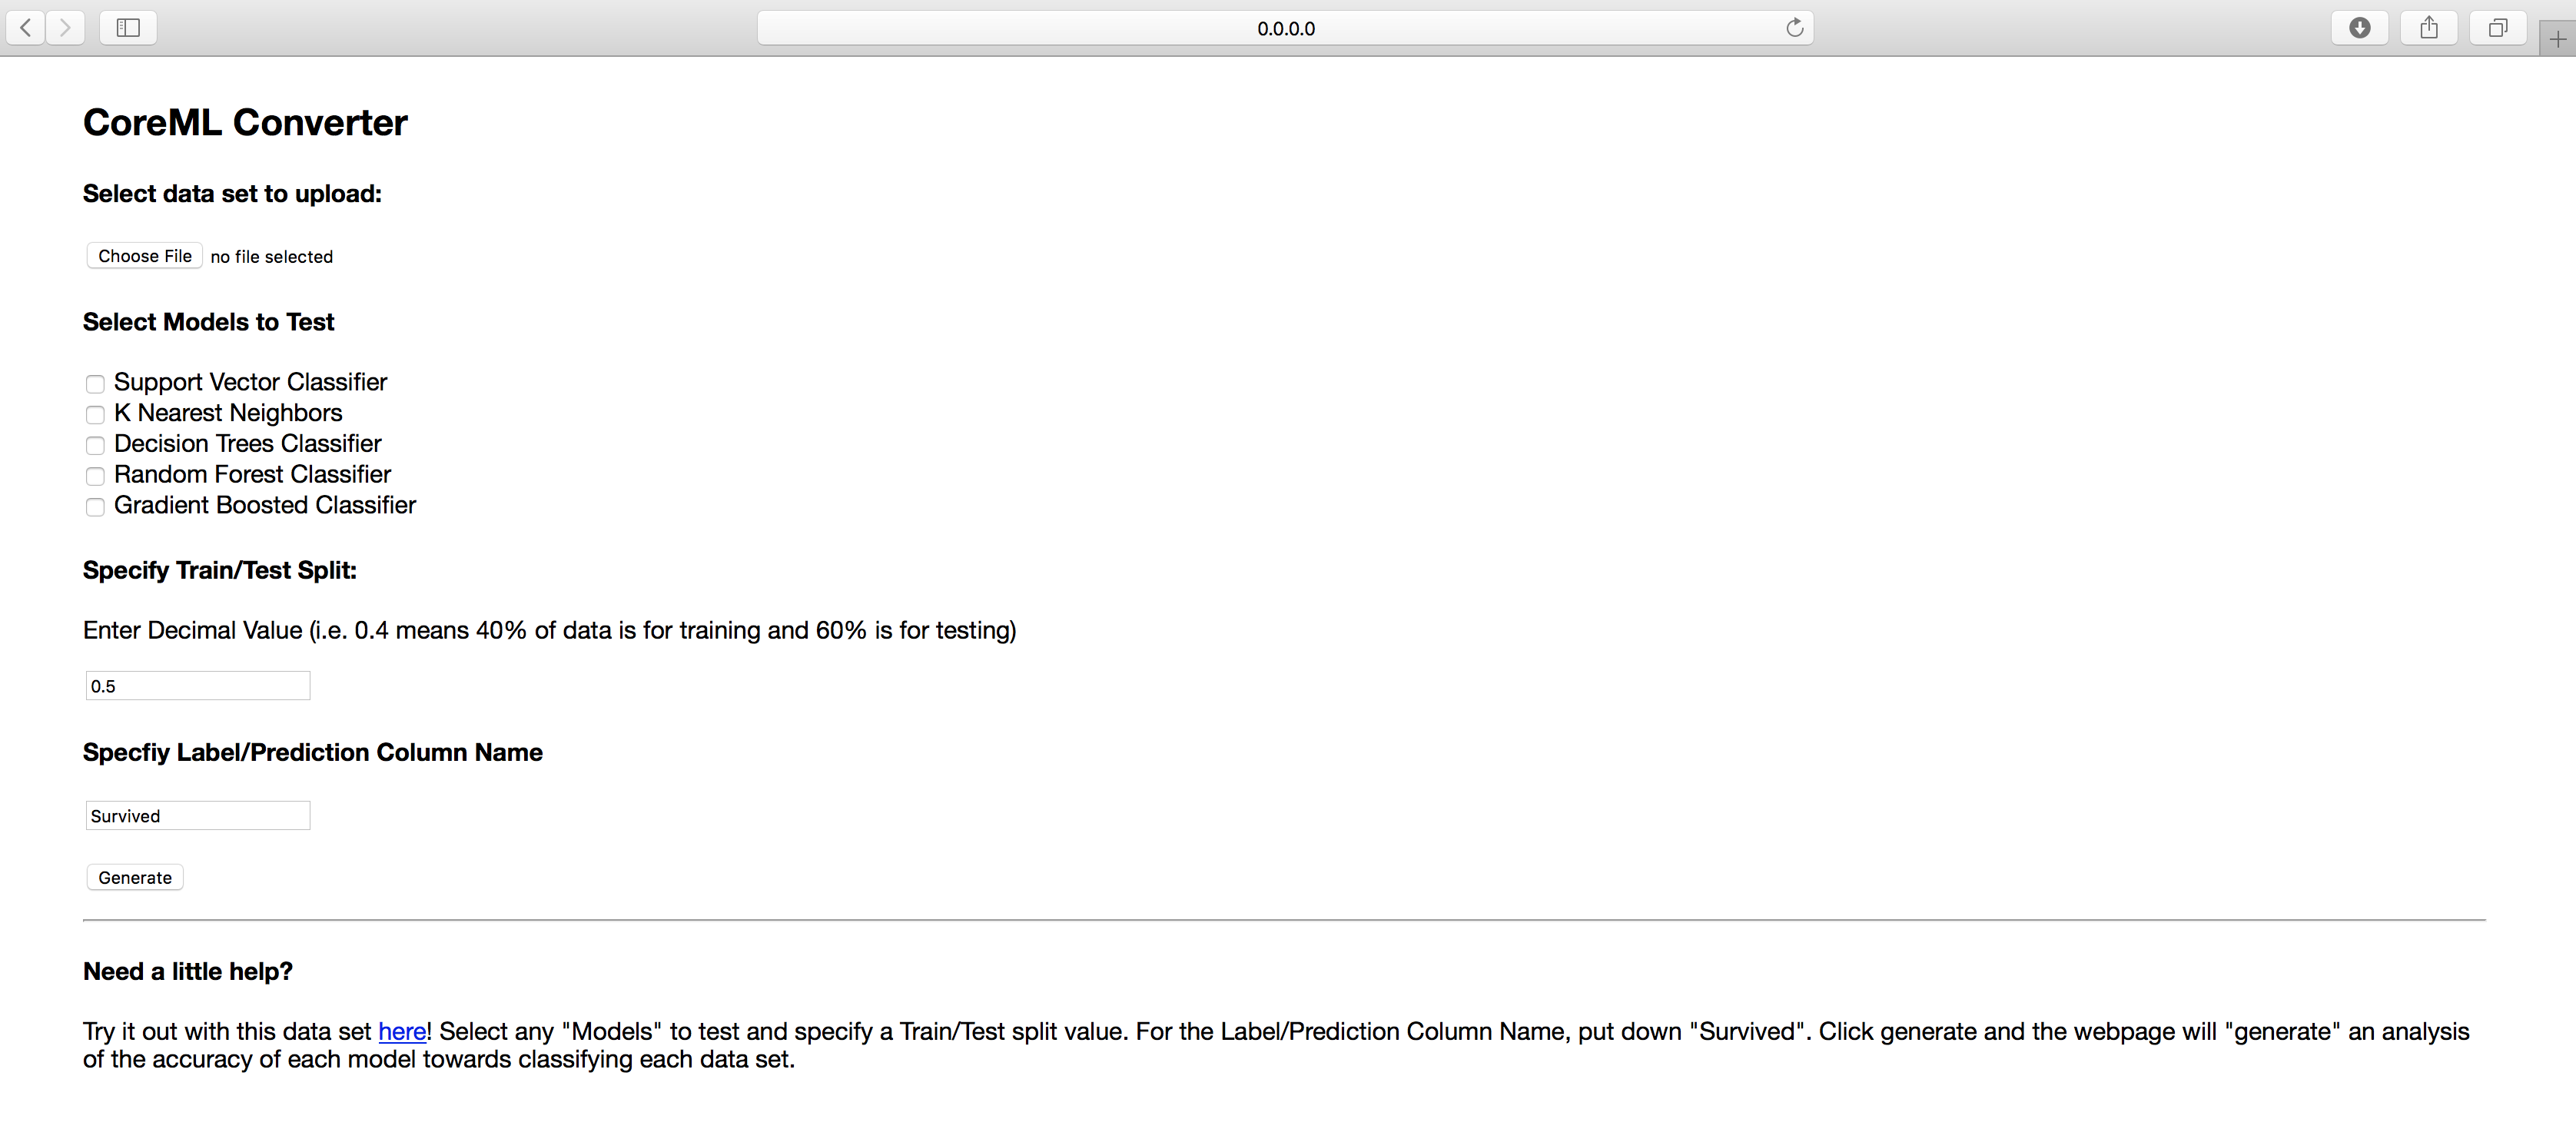
As you can see, at its current state, it's a very rudimentary layout. I'm working on making the UI more bearable, so the emphasis right now is entirely on the UX aspect. Hopefully, it's intuitive to understand how the website works. The user uploads a file containing the label and vector data. Then, the user can select models to test from a predefined list of choices. The third step involves specifying the test-train split value, aka what percentage of the data set should be allocated for what purposes. Last but not least, the user indicates which column in the data set contains the label data. The Flask backend routing checks whether all these parameters have been filled. If so, the data is translated and fed into the conversion function above. The resulting string output containing the performance of each model is output on a separate results page that appears after clicking generate. Last but not least, on the results page, the user can select a model to be converted into CoreML format with the data set, then download the ML Model. As you can see, it's not all that complicated.
What's Next?
As you can see, this project is far from finished, but I'd like to think I'm off to a good start. The two most prioritized, overarching goals at the moment would be 1. Improving the flexibility of the conversion script and 2. Creating a better and more dynamic website that reflects the increased flexibility. As detailed above, I want the script to be more dynamic not only in terms of which machine learning models are available to be trained, but also with regards to customizing the respective set of parameters that go into each model. When discussing the front end, I'm hoping that the website won't look as static in the future. Instead, I'd probably break each of the steps into separate pages. Ideally, the pages being displayed would change based on what the user selects for different parameters. For example, if the user wanted to test a KNN classification structure, the next page would be a list of KNN model parameters that the user could set. On the other hand, if he or she selected a Decision Tree classifier, the parameters page would look different.
Hope you enjoyed the read! As this is a project in the works, I'd love to hear any critiques and suggestions you have in the comments below!